Have you ever slipped on a wet floor or a slippery staircase? It’s not just embarrassing—it can be dangerous. Whether at home, in the workplace, or in public spaces, preventing slips and falls is crucial. This guide will take you through the entire process of installing anti-slip tape, ensuring a firm grip on every step. From selecting the right materials to securing the tape properly and maintaining it over time, you will find all the essential details you need. By the end of this guide, you will know exactly how to install anti-slip tape like a pro.
Tools and Materials for Installing Anti-Slip Tape
Essential Tools for Proper Installation
A measuring tape is crucial to get accurate dimensions of the area where the anti-slip tape will be placed. Cutting the tape precisely requires a sharp utility knife or a pair of sturdy scissors. A straight edge will help guide your cuts, ensuring clean, even edges for a professional look. A roller or a squeegee is necessary for applying firm pressure to eliminate air bubbles and secure the tape to the surface. If you plan to use fasteners, a drill or screwdriver will be required to attach the tape securely to certain materials.
Materials That Ensure a Lasting Application
The most important material is, of course, anti-slip tape. Depending on the environment and level of moisture exposure, you may opt for waterproof anti-slip tape for added durability. A strong adhesive or fasteners will be necessary depending on the surface type. Some applications may also require a cleaning solution to remove any dirt, grease, or debris before installation, ensuring a firm bond.
The Preparation for Anti-Slip Tape
Proper preparation is crucial for a long-lasting and secure anti-slip tape application. Without a clean and well-prepared surface, the tape may not adhere properly, leading to premature peeling or inefficiency.
Cleaning the Surface for Maximum Adhesion
A clean surface is non-negotiable. Dirt, dust, and grease can interfere with the adhesive properties of anti-slip tape. Using a degreasing cleaner or an alcohol-based solution can help remove any residue, ensuring maximum adhesion. In industrial settings, pressure washing may be necessary to remove embedded dirt from textured surfaces. Allowing the surface to dry completely before applying the tape is key to preventing adhesion issues.
Measuring and Marking the Placement Area
Accuracy matters when installing anti-slip tape. Measuring the surface beforehand will prevent waste and ensure an even, professional-looking application. Marking the area with a pencil or chalk can serve as a guideline, helping to place the tape precisely in the intended location.
Cutting the Tape to Fit the Surface
Anti-slip tape needs to be cut to the right length and width to fit the intended area perfectly. Using a utility knife and a straight edge helps achieve clean, straight cuts, ensuring a seamless appearance. For staircases, cutting the tape slightly longer than the step can enhance grip and prevent peeling at the edges over time.
Applying the Tape to Various Surfaces
Different surfaces require slightly different approaches when applying anti-slip tape to ensure maximum effectiveness and durability.
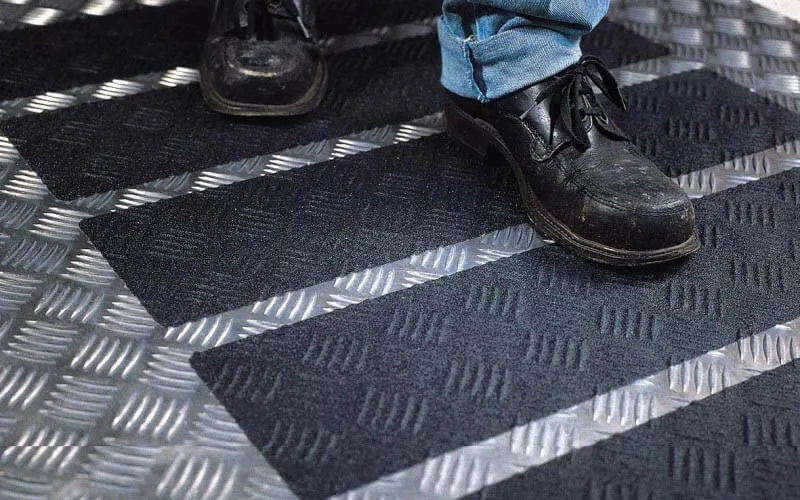
Installing Anti-Slip Tape on Floors
Applying anti-slip tape to a floor begins with ensuring the surface is completely dry and clean. Once measured and cut to the right size, peeling off the backing should be done carefully to prevent the tape from curling or sticking to itself. Pressing the tape down firmly with a roller or squeegee will remove any trapped air bubbles and create a secure bond.
Securing Anti-Slip Tape on Stairs
Stair treads often see heavy foot traffic, making proper installation critical. Each stair should be measured separately, as variations can occur. Positioning the tape close to the stair edge but not too close ensures maximum grip while preventing premature peeling. Pressing the tape down firmly and rolling over it ensures a secure hold that lasts.
Ensuring Grip on Ramps
Ramps require careful placement of anti-slip tape, especially for wheelchair access. Installing strips along the incline at regular intervals rather than in one continuous piece can improve traction while preventing the tape from lifting due to frequent use. Ensuring the tape adheres to the entire ramp surface without bubbles or wrinkles will enhance durability and safety.
Securing the Tape with Fasteners or Adhesives
While anti-slip tape typically comes with a strong adhesive backing, some high-traffic areas or uneven surfaces may require additional securing methods.
Using Adhesives for a Permanent Bond
For long-term installations, reinforcing the tape with industrial-grade adhesive can enhance its durability. The adhesive should be applied evenly to prevent weak spots. Allowing it to cure properly before exposing the tape to foot traffic will ensure a strong bond.
Fastening the Tape with Screws or Bolts
For outdoor or industrial applications, securing anti-slip tape with fasteners may be necessary. Drilling pilot holes through the tape and using screws or bolts can anchor it securely, preventing peeling due to weather exposure or heavy traffic.
Related article: What is anti-slip tape?
Maintenance and Cleaning of the Tape
Maintaining anti-slip tape is essential for ensuring ongoing safety and performance. Proper care can extend the lifespan of the tape significantly.
Regular Cleaning for Maximum Grip
Dirt and grime can reduce the effectiveness of anti-slip tape over time. Using a mild detergent and a soft brush can remove accumulated debris while preserving the tape’s texture. Harsh chemicals should be avoided as they can degrade the adhesive.
Inspecting for Wear and Tear
Checking the tape periodically for signs of peeling or fraying ensures that it remains effective. Areas with heavy foot traffic may require more frequent inspections. If any section starts to lift or deteriorate, replacing it promptly prevents accidents.
Knowing When to Replace the Tape
Even the best anti-slip tape has a lifespan. Replacing it before it loses effectiveness is essential. Depending on usage and exposure, replacement may be required every one to three years to maintain optimal performance.
Conclusion
Installing anti-slip tape correctly can significantly reduce the risk of slips and falls, enhancing safety in homes, workplaces, and public spaces. By following proper installation techniques, securing the tape effectively, and maintaining it regularly, you can ensure long-lasting grip and protection. Fonitaniya™ has been an industry leader in adhesive solutions for over 15 years, continuously innovating to provide reliable anti-slip tape for various applications.
FAQs
How do I remove anti-slip tape without damaging the surface?
Removing anti-slip tape requires applying heat with a hairdryer or heat gun to soften the adhesive. Slowly peeling back the tape at an angle reduces the risk of damage. Any residue left behind can be cleaned with an adhesive remover or rubbing alcohol.
Can I use anti-slip tape on wet surfaces?
Anti-slip tape should always be applied to a dry surface. For areas exposed to moisture, waterproof anti-slip tape is the best option. Ensuring the tape is firmly adhered and free of air bubbles will enhance its performance in wet conditions.
How long does anti-slip tape last?
The lifespan of anti-slip tape depends on foot traffic and environmental exposure. In residential settings, it can last up to three years, while high-traffic commercial areas may require replacement every one to two years.
Is anti-slip tape safe for outdoor use?
Yes, high-quality anti-slip tape is designed for both indoor and outdoor use. For outdoor applications, choosing waterproof anti-slip tape with UV-resistant properties ensures durability against weather elements.
Can I install anti-slip tape on uneven surfaces?
Anti-slip tape works best on smooth surfaces. If the surface is uneven, using a primer or additional adhesive can help improve adhesion. For extremely rough surfaces, securing the tape with screws may be necessary.