Have you ever faced the daunting task of painting a room, only to find yourself dealing with unintended paint splatters and uneven edges? A successful painting project goes beyond just picking the right color; it also involves mastering the art of using painter’s tape. In this article, we’ll reveal essential tips and techniques to help protect your surfaces, ensuring a clean, professional finish you can be proud of.
How to Protect Floors Before Painting
To protect your floors from spatters and stains, you should lay down a protective plastic sheet that covers the entire surface—corner to corner. If the baseboards don’t require masking, simply tape the edges of the plastic firmly to the floor. However, if you do need to mask off the baseboards, opt for a masking film. Tape the edge of this film to the plastic sheets that cover the floor to create an effective barrier.
Protecting the floor should always be one of the first steps in prepping a room for painting In case a stray drop of paint does fall onto your floor, have a damp cloth or paper towel handy. Wiping off paint while it’s still wet increases your chances of removing it without staining or damaging your flooring.
Additional Tips for Floor Protection
When preparing your floors, consider moving furniture out of the way instead of shifting it around. This approach prevents accidental nicks and scratches. Also, try using canvas drop cloths instead of plastic; they are absorbent, reducing the risk of slips.
How Do I Protect the Walls When Painting?
Protecting your walls during a paint project involves careful masking. This step is crucial for avoiding unsightly paint bleed. Take your time to ensure that all masked areas are leak-free, saving you from unnecessary touch-ups later.
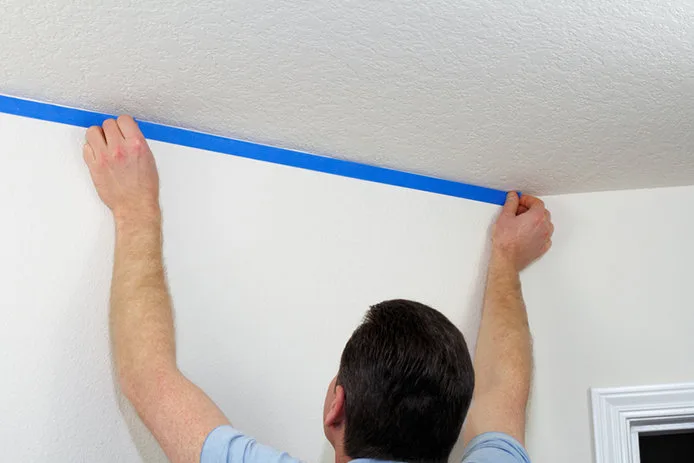
To protect your walls, start by sticking one end of a 2-inch painter’s tape to the wall. Carefully pull about 10 feet of tape from the roll and tear it off. Ensure the tape doesn’t stick to itself by tacking only the end to the wall. Next, press the top of the tape into the corner where the wall meets the ceiling. An excellent practice is to unfold your plastic paint tarp and slip its top edge under the loose flap of the tape, making sure it adheres well.

Using quality painter’s tape designed for wall applications often leads to a neat finish. Research shows that using high-quality painter’s tape can reduce your post-painting cleanup by up to 50%.
How Long Can I Leave Painter’s Tape Up Before Painting?
For optimal results, it’s crucial to apply and remove painter’s tape within a short time frame. Painter’s tape is engineered to stick well, but some varieties are designed for longer adhesion—ranging from 3 days to as much as 60 days. Always check the product specifications to determine the best tape for your project.
Removing the painter’s tape while the paint is still wet yields the best results. This technique prevents the tape and paint from forming a strong bond, which could result in jagged lines or lifting of painted areas. Experts suggest removing the tape while the paint is tacky to enhance the overall look of your edges tremendously.
Related article: advanced techniques for using masking tape.
Can I Remove Painter’s Tape Before It’s Dry?
No, in fact, it’s best to remove painter’s tape before the paint completely dries. This prevents the tape from bonding with the paint, which can create jagged edges—something every painter dreads.
If you find yourself in a situation where the paint has dried completely, there is still hope. Use a razor blade to carefully break the bond between the tape and the paint. Running the blade along the edge of the tape allows you to pull it back slowly. If you hear ripping noises, you are likely pulling the tape too fast, which can lead to damaging your freshly painted surface.
Conclusion
In this guide, we explored how to secure successful painting projects with effective painter’s tape techniques. We highlighted the importance of protecting your floors and walls, as well as the ideal practices for tape application and removal. Remember, investing in quality painter’s tape can vastly improve your painting experience. At Fonitaniya Tape, we have been producing adhesive tapes including painter’s tape for over 15 years. With the right techniques, tools, and products at your disposal, you are well on your way to transforming your spaces beautifully. Happy painting!
FAQs
What types of painter’s tape are available?
Painter’s tape comes in various types, including multi-surface, delicate surface, and low-tack options, each suited for specific projects.
Do I need to mask off everything before painting?
It’s advisable to mask off any areas you want to protect, including trim, windows, and doors.
How do I choose the right masking tape for my project?
Consider the surface type and the duration you’ll need the tape. For instance, delicate surfaces need low-tack tape.
What’s the best way to remove painter’s tape without damaging the wall?
Carefully peel the tape back at a 45-degree angle, ensuring you go slowly to avoid pulling off paint.
How do I store painter’s tape for future use?
Store painter’s tape in a cool, dry place, ensuring the adhesive side is covered to maintain its stickiness.


