Have you ever faced frustration while using painter’s tape, wondering why it didn’t perform as expected? Understanding the performance of painter’s tape is crucial for achieving clean, professional results in your painting and DIY projects. In this article, we’ll delve into the various factors that impact the effectiveness of painter’s tape, including UV resistance, drilling applications, and the importance of using the right tape for the job. Let’s uncover the secrets to making your painter’s tape work for you!
Why Does UV Resistance Matter When It Comes to Painter’s Tape?
UV radiation can reduce the time you can leave painter’s tape up.
When tackling outdoor projects, the type of painter’s tape you select can significantly affect your results. Painter’s tape is designed to help achieve smooth, clean lines, but have you considered its resilience against ultraviolet (UV) radiation? Here’s why UV resistance is essential for outdoor work.
Clean removal impact
Clean removal refers to the ability to take off the tape without damaging the underlying surface or leaving any sticky residue. The goal of painter’s tape is to stay adhered for a specific period, known as the clean removal period, which can range from one day to 60 days, depending on the product. However, UV light can interfere with this plan.
When exposed to UV radiation, the adhesive that secures painter’s tape can degrade. As the adhesive breaks down, it can result in a clean removal period shorter than advertised. This degradation occurs because UV rays affect the chemical bonds in the adhesive, leading to messy removals that can mar surfaces.
What to look for
If you plan to use painter’s tape outdoors, opt for a UV-resistant version. This specific tape is formulated to withstand sunlight exposure, allowing it to be left up for longer periods without degrading. Using UV-resistant painter’s tape not only protects your surfaces but also ensures that your paint job remains neat and professional.
UV can totally remove the adhesiveness of some tapes. To learn more, please visit UV tape.
How to Make Drilling Projects Easier with Painter’s Tape
Drilling projects can be daunting, especially when it comes to avoiding splinters or misaligned screws. Painter’s tape can significantly ease these challenges. Here are effective ways to leverage painter’s tape in your drilling tasks.

Avoiding splinters
Splintering is a common issue when drilling wood, but painter’s tape can help prevent it. This solution is beneficial because painter’s tape leaves no sticky residue, ensuring the wood’s surface remains intact.
To use painter’s tape effectively, lay a strip over the area where you intend to drill. Once you’ve marked the spot, drill through the tape and into the wood. The tape serves to hold the wood fibers together, providing support as you drill. After drilling, simply peel off the tape to reveal a clean hole without splintering.
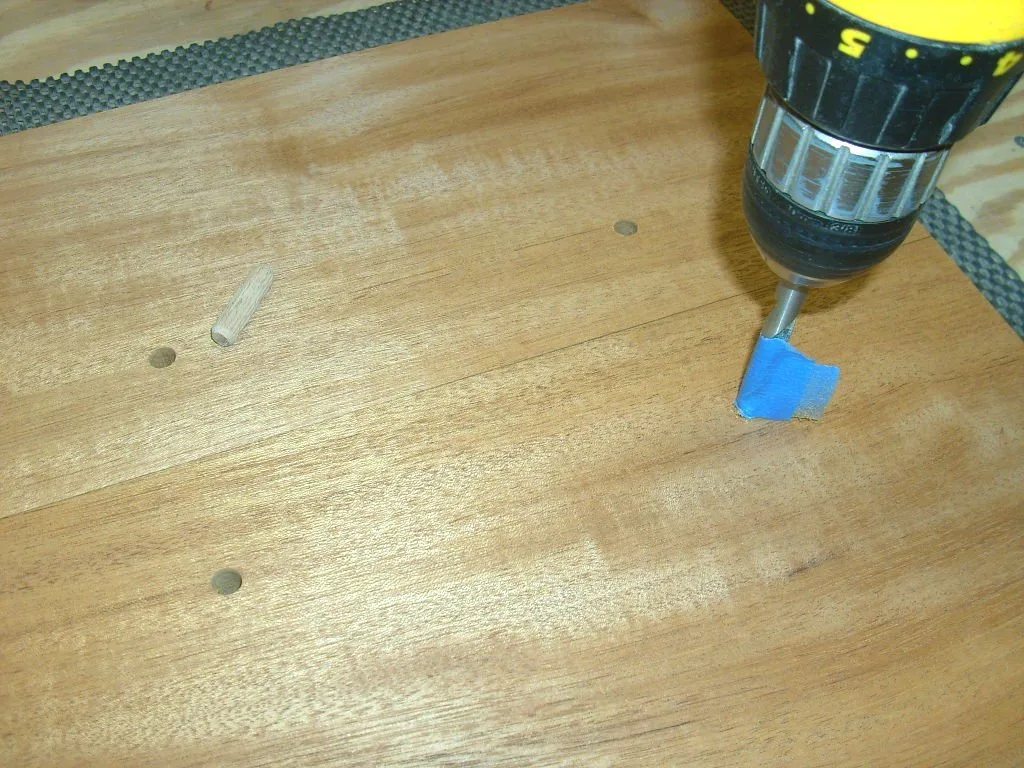
Additionally, painter’s tape can function as a depth guide. Cut a small piece and wrap it around your drill bit at the desired depth. This simple trick allows you to know precisely when to stop drilling, enhancing accuracy.
Wall mounting
When it comes to wall mounting, proper alignment of screws is essential. Painter’s tape can assist in achieving accurate placements. Start by placing a piece of tape on the back of the item you want to mount. Once positioned, use a pencil to poke holes in the tape where the screws will go.
Remove the tape from the item, stick it on the wall, and drill through the tape into the marked holes. When finished, take off the tape, and you’ll have perfectly aligned screw holes.
Should Duct Tape Be Used as Painter’s Tape?
Duct tape should never be used as a replacement for painter’s tape.
With so many tape options available, it’s easy to wonder if other types, like duct tape, could suffice for painting tasks. However, duct tape is not appropriate for these projects, and here’s why.
Painter’s tape vs. duct tape
Painter’s tape is specially formulated for temporary bonding during painting, while duct tape is designed for strong, permanent adhesion. This distinction is critical when choosing the right tape for your painting tasks. Painter’s tape is crafted to create sharp paint lines, whereas duct tape’s rough edge can lead to uneven paint applications.
Additionally, duct tape’s strong adhesive can damage your surfaces. When removed, duct tape often leaves a sticky residue or may pull away paint or wall material. Choosing painter’s tape ensures clean, crisp lines without the risk of damaging the painted surface.
Use painter’s tape instead
The clear choice for painting projects is painter’s tape. Its temporary bond, clean removal, and precision make it the best option for protecting surfaces while ensuring professional results. When it comes to painting, don’t compromise your work—always reach for painter’s tape.
Related article: what is duct tape?
How to Prevent Wood Splintering with Painter’s Tape
Painter’s tape can prevent wood splintering and “tear out”.
Woodworking projects, especially those involving plywood, can suffer from splintering, leading to less-than-perfect results. Fortunately, painter’s tape can prevent these issues effectively. Understanding why wood splinters helps in mitigating this problem.
Why does wood splinter?
Wood is composed of tiny fibers that run along its length. Cutting against the grain puts stress on these fibers, making them prone to splitting. When you cut wood and these fibers are unsupported, splintering occurs.
To mitigate this, always begin by cutting on the backside of the wood, if possible. If you have to work on both sides, painter’s tape can serve as an effective barrier.
Where to begin
Before you apply painter’s tape, consider scoring the cut line to help control the direction of the wood fibers. Apply the painter’s tape over the cut line to hold the fibers together as you cut. Once you’ve made your cut, removing the tape will leave you with a clean edge, free from splinters.
Using Masking Tape in Humid Conditions
Humidity can make you rethink your strategies when using masking tape for various projects. Whether for labeling, painting, or crafting, understanding how humidity affects tape performance is crucial.
Humidity
When working in humid conditions, excess moisture can weaken the adhesive properties of masking tape. High humidity may cause moisture to accumulate on surfaces, compromising adhesion. Conversely, low humidity can dry out adhesives, causing reduced stickiness and increased dust accumulation.
To combat these issues, always clean surfaces before applying tape. Ensure the area is dry for optimal adhesion.
Storage
Proper storage is just as important as application. Humidity levels can impact tape performance not just during use but also while in storage. To maintain the integrity of your masking tape, avoid high or low humidity environments. Seek to store tape in a cool, dark place away from moisture, ideally at a relative humidity below 50%.
Related article: Introducing painter’s tape.
Conclusion
In conclusion, understanding the performance of painter’s tape is crucial for maximizing its effectiveness in your projects. Factors like UV resistance, proper drilling techniques, and storage conditions can significantly impact your results. Always choose painter’s tape tailored for specific tasks, as it ensures clean removal and protects surfaces, making your work easier and more professional. At Fonitaniy tape companies, we have been an innovative adhesive solutions provider for over 15 years, specializing in painter’s tape and masking tape to meet your diverse needs. Our commitment to quality ensures you achieve the best results on any project!
FAQs
What is painter’s tape used for?
Painter’s tape is designed for masking surfaces during painting, providing clean edges and easy removal.
Is painter’s tape better than masking tape?
Yes, painter’s tape is ideal for painting due to its clean removal and precision compared to masking tape.
Can I use painter’s tape outdoors?
Yes, but for outdoor projects, choose UV-resistant painter’s tape to prevent adhesive degradation.
How long can I leave painter’s tape on?
The clean removal time varies but generally ranges from one day to 60 days, depending on the specific tape.
Does humidity affect masking tape?
Yes, high humidity can weaken adhesion, while low humidity can dry out the adhesive, affecting performance.


